A cluster of Pi's


Please see disclaimer
First let me acknowledge... What I built is technically a cluster of Pi's, but it is not a cluster system - yet. When the Raspberry Pi 4 was introduced, I spent many hours researching what I could do with it. Clustering was among the top results but I have yet to figure out a purpose. I mean I love tinkering for the sake of tinkering but I also like to have a usable end result. I did this with cameras and Zoneminder, HomeAssistant, WordPress, iRedMail, and a few other things. Whether what I built and how I use it is practical, is a whole different story. I know I wanted a few of them put together and doing something. For now I have them working independently mining Magi coins which I will describe in another post. I found the build itself to be satisfying and easy. Also, I can easily convert to a Docker Swarm, Kubernetes Dramble, Hadoop or Beowolf cluster later if I see fit.
Bill of Materials:
- Pi 4 board - I am using the 4GB which is overkill but since I may later decide to use these for something else, I would rather have the better of the 3 versions. I also did not want to run multiple power supplies so I went with a more barebones kit.
- Micro SD cards - Again, these are probably overkill for my purpose but I would invest in the better long-term use.
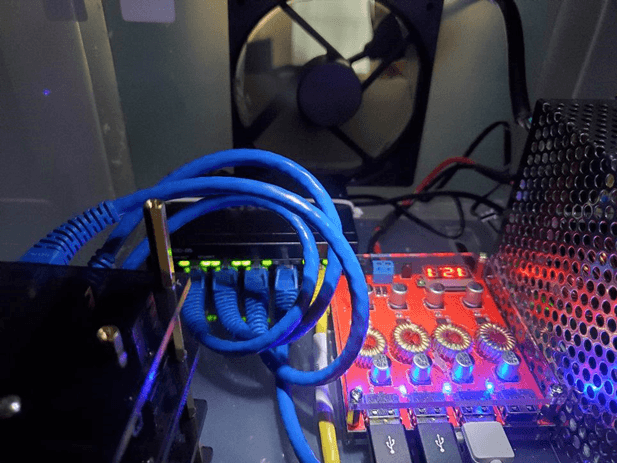
- Transformer - 110v (or 220v) in and 12 V 100W out to power all the Raspberry Pis, the USB power buck, and the network switch.
- USB Power Buck - DC 8-30V In and 4x USB output at 5V up to 25W each.
- Tower Case for the Pis - This case suits my purpose for now. The reviews are mixed but mine is sturdy and I especially like the individual fans.
- Ethernet Switch - I had one of these lying around and it was perfect as it needed 12V so one less power cord for me!
- Patch cables - I had these already
- 110 line cord - This has an in-line on/off and was easy enough to cut the end off and tie into the transformer.
- USB cables for power - either need USB C or USB Micro with adapters (come with the Pi kit above).
- Project Case - I want it self-contained and this has ample room to house all the components with room to spare or stack. The top pulls off to make it easier to manage everything.
- Fan(s) (optional) - I had one of these lying around from my last NAS build. This also runs on 12V so it is easy to wire in.
- Wire - I used 14 gauge which was too large for all the connectors. I would use 16 or maybe 18 if I built again.
This can also be built without the switch and Ethernet cables by utilizing the on-board WiFi. I typically have no problems running anything over WiFi but didn't want the extra traffic at this time and had enough parts lying around anyway.
Micro SD card prep:
Just to touch on this as it will help later, be sure you flash all your micro SD cards with your OS of choice. I am using the latest Raspbian Buster Lite. This is also a good time to enable SSH. After you install the OS for each card, save an empty file named ssh. Be sure to save it without a filetype - if you are using windows it will try to save it as a .txt.
Component Assembly:
First assemble the tower case with Raspberry Pis. Be sure to remember your heat-sinks! Pis typically get warm or even hot and the Pi 4 is even more so likely to overheat. Apply the heat-sinks from the Pi kit and then start building the tower from the bottom up. I placed my fans with the sticker facing down. For me this means air will blow down over the heat-sinks.
Get your case and start working on your layout. I chose to mount the transformer on its side with the maximum number of vent holes facing outward to the center of the case. The transformer was never more than warm in the prototype phase but as a safety precaution, why not. I drilled holes into the case and mounted with a couple of M3 bolts and screws I had already. With the largest object mounted it makes it easier to see the available room left.
Next I added the switch into the left rear of the case by drilling a couple of holes and zip ties. Be sure to leave enough room for the power connector on the rear. Moving right along to the USB power buck, I mounted it the same way, drill holes and zip ties, in the center of the case and just in-front of the switch.
Wiring Assembly:
In the package with the USB power buck was a power pigtail. It is intended to power the hub but I found it to be too small of a wire gauge for my current purposes but it works wonderfully for powering the network switch. Go ahead and wire it to the transformer making sure you maintain the proper polarities then plug it into the switch. Take two pieces of wire, 14-18 gauge and wire from the transformer to the USB power buck at this time again paying close attention to the polarities.
Now place the Pi tower in front (or front-left) and finish the connections. Connect the Pis to the switch with the patch cables and connect the USB cables between the Pis and the USB power buck. If you are using USB micro cables, the Pi kit should have come with a micro-C adapter.
Take the AC power cord (do not plug it in yet!) and cut off the female plug end as close as you can. Strip back the insulator to leave the black, white, and green wires. These translate out to Line, Neutral, and Ground respectively. Be sure to secure these properly into the proper terminals. I made a little cut in the back of the case to run this out. Last but not least, run an Ethernet cord from your main network switch to the new switch.
Power it up:
Flick the switch on the power cord and everything should start lighting up if you previously flashed your micro-SD cards. At this point, we do not know which Pi is which. You may want to power them down and then back up individually so you can change the hostnames to better identify later. Check you router for new devices, assuming you have DHCP, and ssh into each. Be sure to run sudo raspi-config, sudo apt-get update, and sudo apt-get upgrade to get everything running current and named properly.
As noted above, I had an extra fan so I cut out a hole in the back and mounted it. I snipped off the standard connector and connected positive and negative to the transformer to maintain a little extra air-flow throughout the case.
Side notes:
In the future, I might try using the Pi POE Hat later as this would remove the need for the transformer, USB power buck, and additional network switch - and free up a lot of space. My way was cheaper but only because I had the switch already. Another thought, along with the POE Hat, would be to utilize DIN mounting which would look cleaner in my rack.
Another consideration is that the method above has all the traffic going back through my existing network. I am pretty sure it would be better in an actual cluster system to segregate the internal communications onto a private network with one Pi acting as a master. This would mean a dedicated switch would still need to be used.